Solidification of ternary alloys – Class II reactions
The ternary system below has a class II invariant point. Associated with this point is an Ubergang or (class II) reaction:
\[ \rm{L + \alpha \rightleftharpoons \beta + \gamma} \]Two of the bounding binaries for this system have binary eutectic points. The third has a binary peritectic point. A eutectic valley and a peritectic valley run from their respective binaries to the invariant point. A second eutectic valley runs from the invariant point to the lowest temperature binary eutectic point.

Figure 15: A ternary system with a class II invariant point. Adapted from https://commons.wikimedia.org/wiki/File:Space_diagram_of_a_three-component_system.jpg
This system has three single-phase regions (\( \rm{\alpha, \beta } \) and \( \rm{\gamma} \)), three two-phase solid regions (\( \rm{\alpha + \beta, \alpha + \gamma, \beta + \gamma} \)), one three-phase solid region (\(\rm{ \alpha + \beta + \gamma} \)), three two-phase solid and liquid regions (\(\rm{ L + \alpha, L + \beta, L + \gamma} \)), three three-phase regions (\(\rm{ L + \alpha + \beta, L + \beta + \gamma, L + \alpha + \gamma} \)) and a single phase liquid region.
A notable difference between this system and one with a ternary eutectic point is that two of the three phase regions lie below the invariant point (\(\rm{ \alpha + \beta + \gamma} \) and \(\rm{ L + \beta + \gamma} \)) rather than just one (as in the ternary eutectic case).
There are five kinds of solidification routes worth considering in this system:
- Alloys that do not pass through a three-phase region on cooling
- Alloys that pass through a three-phase region above the invariant point but not through the invariant point
- Alloys that pass through a three-phase region below the invariant point but not through the invariant point
- Alloys that go through the invariant reaction and are fully solid below the invariant point
- Alloys that go through the invariant reaction and are not fully solid below the invariant point
The kind of solidification route an alloy takes can be determined by observing where the composition lies in at the invariant temperature.
An example isothermal section from a system with a class II reaction at the invariant temperature is shown below:
Figure 16: The invariant reaction plane for a ternary system with a class II reaction.
This is the invariant reaction plane. It shows four phases in equilibrium. This can be shown by either the \(\rm{ L + \alpha + \beta} \) and the \(\rm{ L + \alpha + \gamma} \) tie triangles or by the \(\rm{ \alpha + \beta + \gamma} \) and the \(\rm{ L + \beta + \gamma} \) tie triangles. The invariant plane is a trapezium which forms from two tie triangles on cooling into the invariant temperature and it decomposes into two tie triangles cooling out of the invariant temperature.
The invariant point is the composition of the liquid in this four-phase equilibrium. Note that the liquid composition lies outside of the \( \rm{\alpha + \beta + \gamma} \) tie triangle to form a trapezium. This is characteristic of class II reactions. The liquid can combine with the solid opposite it to form the other two solids. Any other reactions involving these four phases, of these compositions would violate the conservation of mass.
Figure 17: Isothermal section at the invariant temperature for a system with a class II reaction showing only single-phase solid fields.
At the invariant temperature, maximum solubility of unlike atoms in single phase solids occurs. If an alloy plots in a single-phase field at this temperature, it will cool without passing through a three-phase region. This cooling is analogous to an alloy cooling through a two-phase solid + liquid region in a system with complete solid solubility. This case has been discussed on previous pages.
There are two cases where an alloy passes through a three-phase region above the invariant point but not through the invariant reaction.
Figure 18: Isothermal section at the invariant temperature for a system with a class II reaction showing only the \( \rm{\alpha + \beta } \) field.
If an alloy plots in the \(\rm{ \alpha + \beta} \) region it will undergo the monovariant peritectic reaction. First, \(\rm{ \alpha} \) will be precipitated until the composition of the liquid lies on the peritectic valley. The peritectic reaction will occur (in an analogous way to a monovariant eutectic with the relevant tie triangle sweeping past the bulk composition) and the a will react with the liquid to form \( \rm{\beta} \) until the liquid is fully exhausted and the system is fully solid.
Figure 19: Isothermal section at the invariant temperature for a system with a class II reaction showing only the \( \rm{\alpha + \gamma} \) field.
If an alloy plots in the \( \rm{\alpha + \gamma} \) region, then it will undergo a monovariant eutectic reaction where either \( \rm{\alpha} \) or \(\rm{ \gamma} \) are precipitated until the liquid composition lies on the \( \rm{\alpha + \gamma} \) eutectic valley. At this point both \(\rm{ \alpha} \) and \( \rm{\gamma} \) are precipitated until the system is fully solid.
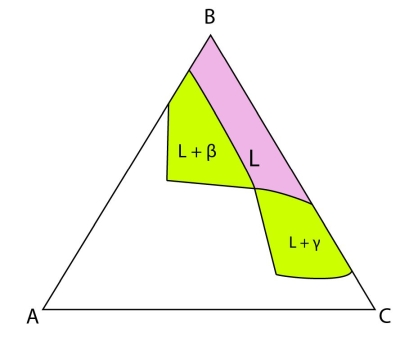
Figure 20: Isothermal section at the invariant temperature for a system with a class II reaction showing only the \(\rm{ L + \beta , L + \gamma} \) and \(\rm{ L} \) fields.
In the case where an alloy passes through a three-phase region below the invariant point, this alloy plots in the \(\rm{ L + \beta , L + \gamma} \) or \(\rm{ L} \) region at the invariant temperature. Either \( \rm{\beta} \) or \( \rm{\gamma} \) precipitates initially until the composition of the liquid lies on the \(\rm{\beta + \gamma} \) eutectic valley. Then both \(\rm{ \beta} \) and \(\rm{ \gamma} \) precipitate until the system is full solid.
If an alloy plots in the four-phase trapezium it will undergo the invariant reaction. As there are two reactants in a class II reaction (\(\rm{ L } \) and \(\rm{\alpha} \)) the reaction can be terminated by either of them being exhausted.
Figure 21: Isothermal section at the invariant temperature for a system with a class II reaction showing only the \(\rm{ \alpha + \beta + \gamma} \) tie triangle.
In the case where the liquid is exhausted, the class II reaction is the terminal solidification event for the system as the system is fully solid when the reaction is over. If an alloy plots in the \(\rm{ \alpha + \beta + \gamma} \) tie triangle, then the liquid will be exhausted before \(\rm{ \alpha} \) in the invariant reaction and solidification will cease there.
Figure 22: Isothermal section at the invariant temperature for a system with a class II reaction showing only the \( \rm{L + \beta + \gamma} \) tie triangle.
In the case that \( \rm{\alpha} \) is exhausted and there is remaining liquid, the system is not fully solid at the end of the reaction and will continue to solidify by the \( \rm{\beta + \gamma} \) monovariant eutectic reaction. The composition of the liquid will move away from the invariant point and down the eutectic valley, precipitating \( \rm{\beta} \) and \( \rm{\gamma} \) until the system is completely solid. If an alloy plots in the \(\rm{ L + \beta + \gamma} \) tie triangle, then \(\rm{ \alpha} \) will be exhausted before the liquid in the invariant reaction and this alloy will finish solidifying by the \(\rm{ \beta + \gamma} \) eutectic reaction.
Alloy Q in the diagram below will fully solidify by the class II reaction:
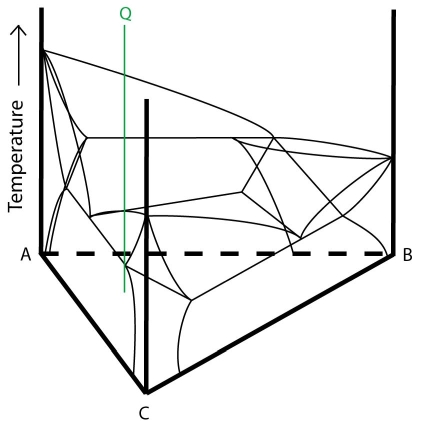
Figure 23: Composition of alloy Q plotted onto a ternary system with a class II reaction. Adapted from https://commons.wikimedia.org/wiki/File:Space_diagram_of_a_three-component_system.jpg
The solidification of alloy Q is described below: